Dip Powder Nails Grow Out
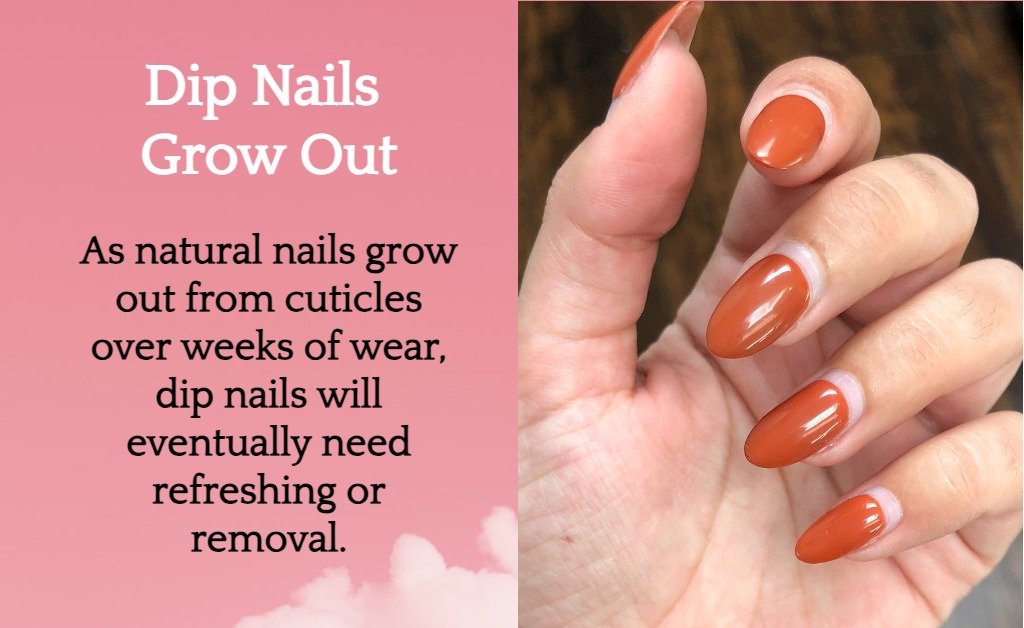
Dip powder manicures are a great way to get a salon-quality look at home. They are durable, easy to apply, and come in a variety of colors. However, they are not permanent, and they will grow out with your natural nails over time. This can affect the appearance and health of your nails, and you may need to refresh or remove your dip nails. when your dip nails grown out and you want to to get ride of them, We have the process for removing grown out dip nails just you need to follow the steps provided below. If you need new dip nails design then checkout new design on Amazon.

What to Do When Dip Nails Grow Out At Home
Dip nails are a popular option for many people who want to have durable and beautiful nails. However, like any other type of nail enhancement, dip nails will eventually grow out and need to be maintained or removed. If you don’t want to go to a salon or spend money on a professional service, you can do it yourself at home with some simple steps for growing out dip nails.
Here is what to do when dip nails grow out at home:
- Decide whether you want to keep or remove your dip nails. If you want to keep your dip nails, you can either fill in the gap between your nail and the dip powder, or apply a new color over your existing dip nails. If you want to remove your dip nails, you will need to soak them off with acetone or a non-acetone nail polish remover.
- If you want to fill in the gap, you will need a base coat, a dip powder, an activator, and a top coat. You can use the same color as your original dip nails, or a different one if you want to change the look.
- First, apply a thin layer of base coat to the gap area and dip your nail into the powder. Tap off the excess powder and repeat until the gap is covered. Then, apply the activator and let it dry. Finally, apply the top coat and let it cure under a UV light or air dry.
- If you want to apply a new color, you will need a gel polish, a base coat, a top coat, and a UV lamp. You can choose any color you like, but make sure it is opaque enough to cover your original dip color.
- First, buff your dip nails gently to remove the shine and smooth the surface. Then, apply a thin layer of base coat and cure it under the UV lamp for 30 seconds.
- Next, apply a thin layer of gel polish and cure it under the UV lamp for 60 seconds. Repeat until you achieve the desired color. Finally, apply a thin layer of top coat and cure it under the UV lamp for 60 seconds.
- If you want to remove your dip nails, you will need a nail file, a cotton ball, a foil, and an acetone or a non-acetone nail polish remover. First, file your dip nails to remove the top layer and make them thinner. Then, soak a cotton ball in the remover and place it on your nail. Wrap a foil around your finger and press it firmly. Repeat for all your nails.
- Wait for 15 to 20 minutes and then remove the foil and the cotton ball. Your dip nails should come off easily. If not, repeat the process until they do. Finally, buff your nails and apply a moisturizer to your nails and cuticles.
These are some of the ways to deal with dip nails when they grow out at home. You can choose the one that suits your preference and budget. However, you should always be careful and gentle when handling your nails, and use the right products and tools. If you are unsure or unhappy with the results, you may want to visit a professional salon or consult a nail expert. You should also moisturize and nourish your nails regularly to keep them healthy and strong.
Detailed Explanation of Nails Growth Cycles
The Growth Cycle Begins
Depending on an individual’s nail growth rate, dip nails applied in a thin flush coating will typically last 2-4 weeks before signs of wear become noticeable at the free edge. During this timeframe, natural nails will continue elongating beneath the artificial surface without visible change. This process is not usually cause for concern if the manicure stays adhered to.
When the dip nail meets the natural nail, some lifting or edge peeling will commonly begin surfacing. Initially, it may appear only slight and minor enough for another week of wear. Around the 2-3 week mark is when most people opt to refresh with a touch-up or full redip manicure. This timing helps preserve salon-quality results while nails are still in overall good condition.
Initial Wear Appears
As natural nails slowly emerge under dips over subsequent days and weeks, one of the first signs will typically be some lifting starting from the free edge and cuticle line. This separation allows humid air and proteins to break the bond with the nail plate. Often the curve of the nail is the weakest hold point.
At this early lifting stage, touch-ups are an affordable way to prolong the manicure and maintain a seamless look. Popular professional dip artists often recommend booking infill services every 2-3 weeks for minimal additional powder reinforcement of worn spots. This refuels adhesion while nails stay completable covered.
Some Unglued Edge Repair Methods
- Use a rubberized or texturized base coat to combat lifting before dipping.
- Seal lifted edges with nail glue or seamless second-skin liquid. Let cure before reapplying powder.
- Pat down lifting with a small brush dipped in an activator then powder to reinforce the bond.
- Spot-fill chips with gel or acrylic paint before recoating powder gently in worn zones.
Nail Growth Speeds Up Breakdown
Those with faster-growing nails will see dips begin to break down more quickly, such as within 2 weeks as nails protrude further. Signs manifest primarily as chipping, peeling, and gaping away from the nail plate. At this point, simply applying more powder over lifting areas is generally ineffective for long-term wear.
The emerging natural nail acts as a wedge, slowly splitting the artificial surface from the substrate it was originally bound to with each millimeter of growth extension. As it migrates farther into the dip manicure, integrity is compromised further. For optimal results and protection of natural nails, removing old dips becomes prudent once new growth significantly meets the tips.
Deep Cleanse Before Redip Manicure
When natural nails extend past the dip edge by 1-2 millimeters or more depending on personal preference, it’s time for a thorough removal step before reapplication. This can be done at home or during a sit-in with a nail tech. Either way, nail prep is essential for a smooth new dipping session.
Be sure to:
- Gently push back cuticles with a cuticle pusher or orange stick.
- Use a 180-grit file or e-file built-in bit to buff the entire nail surface, not just the tips.
- Wipe with acetone or polish remover to dehydrate the nail plate completely.
- Apply the nail dehydrator for 30 sec to evaporate oils and etch nail bed.
- Swipe each nail with an isopropyl alcohol wipe before allowing it to dry.
- Shape nails with a buffer or file to desired dimensions and angles.
Proper nail prep ensures old dip residuals plus any moisture or oils are eliminated, granting an optimal “canvas” for the new dip application seal to last its full potential wear cycle.
Reassess and Refine Nail Shape
Taking the time to reshape nails when removing old dip can also yield extended manicure longevity. More angular or tapered nail beds may have contributed to earlier breakdown by concentrating stresses at vulnerable curve points.
This step provides an opportunity to try a squarish “stiletto” or rounded “oval” style instead of a stronger wear profile. A little desktop modeling or natural shape guidance from an aesthetician can help refine the ideal form. Sticking to natural nail physiology promotes the healthiest growth.
So whether filing at home with buffer blocks or getting loss shaping and cuticle detailing done professionally, chasing the most supportive nail print can boost future dip powder manicure lifespan markedly. Even natural nails will benefit from an occasional contour retouch under a manicurist’s expertise.
Reapply Dips With a Refined Technique
Once nails have been properly prepped and reshaped to your preference, reapplying dip powder in thin coats will reinforce healthy nails for another round of beauty and protection. Whether doing it yourself or booking a tech appointment, here are some pro tips to maximize wear time:
- Apply a base coat specifically formulated to reinforce nail beds.
- Use a very sparing amount of dipping liquid – less is more for a smooth laydown.
- Dip each nail individually, tapping off excess before removing it from the powder.
- Apply ultra-thin layers, allowing full drying between coats (5-10 mins).
- Do 3-4 coats at minimum for durable coverage.
- Finish with a 2X top coat, curing under the lamp for superior shine & chip resistance.
- File, shape, and polish as desired to complete the professional look.
With diligent care habits and touch-ups as needed every 2ish weeks, dipping allows enjoying salon nails even once they start peaking through, for minimal cost and hassle versus other extended wear options. Proper maintenance equals weeks more beauty!
Taking a Break Before Repeat
As natural nails continue extending multiple millimeters past the length of any full redip manicure and show well into the growth cycle, an occasional break period becomes prudent. Every 2-3 full sets are the recommended maximum before giving nails and cuticles a vacation from artificial coverage.
Breaks allow natural moisture levels to balance and nails to breathe freely rather than living constantly under artificial materials. It also diminishes risks of brittleness, peeling, or damage from too frequent removal/ application cycles.
For the break, try one of these low maintenance yet polished looks: naked natural nails with occasional cuticle oil, Sheer single/two-color polish manicure, and Press-on nail polish decals
Here are some additional FAQs that you may find useful:
How to fix grown out dip nails?
To fix grown out dip nails, you have two options: you can either fill in the gap between your nail and the dip powder, or you can apply a new color over your existing dip nails. Filling in the gap will make your dip nails look more natural and even, while applying a new color will give you a fresh and different look. Both options require some products and tools, such as a base coat, a dip powder, an activator, a top coat, a gel polish, a UV lamp, a nail file, and a buffer. You can find detailed instructions on how to do both options in this guide.
How to fill grown out dip nails?
To fill grown out dip nails, you will need a base coat, a dip powder, an activator, and a top coat. You can use the same color as your original dip nails, or a different one if you want to change the look. First, apply a thin layer of base coat to the gap area and dip your nail into the powder. Tap off the excess powder and repeat until the gap is covered. Then, apply the activator and let it dry. Finally, apply the top coat and let it cure under a UV light or air dry.
How to remove dip nails at home?
To remove dip nails at home, you will need a nail file, a cotton ball, a foil, and an acetone or a non-acetone nail polish remover. First, file your dip nails to remove the top layer and make them thinner. Then, soak a cotton ball in the remover and place it on your nail. Wrap a foil around your finger and press it firmly. Repeat for all your nails. Wait for 15 to 20 minutes and then remove the foil and the cotton ball. Your dip nails should come off easily. If not, repeat the process until they do. Finally, buff your nails and apply a moisturizer to your nails and cuticles.
How to care for your natural nails after removing dip nails?
To care for your natural nails after removing dip nails, you should hydrate and nourish your nails regularly. You can use a cuticle oil or a nail treatment cream that contains hydrating oils like jojoba or vitamin E. Massage it into your nails and cuticles daily to replenish moisture and improve blood circulation. You can also use a nail strengthener or a nail hardener that contains keratin, biotin, or calcium.
These ingredients can help strengthen and shield your nails from external damage. You should also avoid using harsh chemicals or products on your nails, such as acetone, nail glue, or nail polish remover. You should also wear gloves when doing household chores or gardening, and keep your nails trimmed and clean.
Conclusion
In short, dip powder nails offer a stunningly supported color that promotes your hand’s impression for several weeks. However, natural nail growth cannot be prevented, and ignoring clear signs of outdated enhancements risks harm. With careful removal allowing acetone to gently dissolve each applied layer, nails emerge refreshed and ready to reset through reapplication or an optional break period.
FAQs
What is the best way to remove dip nails?
Soaking nails in acetone for 10-15 minutes is the most effective way to dissolve the bonds between layers for complete yet gentle removal.
Why should you file dip nails before repainting?
Lightly filing helps deglaze the surface and creates tiny ridges to promote better adhesion for new coats of polish or powder.
How often should you take a break from dip nails?
Most experts recommend breaks of 1-4 weeks between full sets to avoid continuous stress on the nails and allow natural growth cycles.
What causes lifting or bubbles in dip nails?
The natural nail plate continuing to grow and push up against the rigid cured enhancement layers is the main cause of lifting as growth outpaces the coating.
How do you fix lifting dip nails?
Small lifts can be patched with additional pigmented powders applied just to the problem areas, while full lifting requires soaking off and reapplication.
Can you change the color of the dip nails?
Yes, by gently filing and refilling just the free edge portion with new shades every few weeks, the overall look transforms as nails gradually fill in.
What is dip nail “fluorescence”?
The mild fever, fatigue, and slight swelling of some experience within 48 hours after a first dip removal is termed the “dip flu” and results from a sensitization reaction to the chemical components in the powders.
How do you maintain dip nails?
Regularly pushing back cuticles and cuticle care, along with occasional topcoat refreshes to reinforce worn areas keeps sets looking freshly applied.
What’s the healthiest method for long nails?
Following natural growth cycles without continuous rigid reinforcement stress through proper use of dip, gels, or taking breaks is generally healthiest for delicate nails long term.
Why do dip nails appear thicker?
The layered powders create a thickness over the natural nail plate, making the entire finger tip look more bulky than bare nails. This reinforced coating is what provides their durable shininess.
Discover more from Beauty Fashion Palace
Subscribe to get the latest posts sent to your email.


